Todays Easter card uses Cottontail Cuties Stamp Set from Neat and Tangled. First it's stamped with Tuxedo Black Ink on Neenah Classic Crest 110lb card stock. It's colored with Copic Markers and this was my first go at "halo" coloring. One of my table mates at the Daily Marker Road Trip demonstrated it. Finally, the sentiment is stamped in VersaMark Ink and heat embossed with Pink Prisma Embossing Powder (Hero Arts Kit).
The Die'sire Edge'ables Parisian was found at Hobby Lobby -ON CLEARANCE (score!)- and is a little bit smaller than 5 1/2 " tall. I trimmed my paper after I ran both sides through my Big Shot (Sizzix). Wax paper between the paper and die sure does make a difference when cutting detailed dies - paper just pops right out. To finish my card I trimmed my colored image and inked edges with Summer Sky Ink (Memento). Then I created a band of Vellum and card stock. The Easter egg is stamped in the same blue ink and colored with Copic Marker.
Hope you have a wonderful Easter, cherish the ones you love and give thanks to the Lord.
Affiliate links are used at no cost to you. Not all links are affiliate, I just want to share where I found them. All products were purchased by me. I don't sell anything and I'm not employed, this is my hobby and hope you are inspired to play :)
If you color ANYTHING then you will love the Daily Marker Road Trip as much as I did!!! Marcella Hawley from Power Poppy hosted the St Louis event and she is a wonderfully talented and fantastic human! Take a moment and check out her shop, I'm positive you will find as many pretties as I did. Big shout out and thank you to Kathy at The Daily Marker. My best friend and I had a great time and enjoyed Kathy's tips, our new friends (table mates) and our wonderful host Marcella! Any excuse to spend a leisurely day coloring and crafting with my bestie is always a good one. Picture below :)
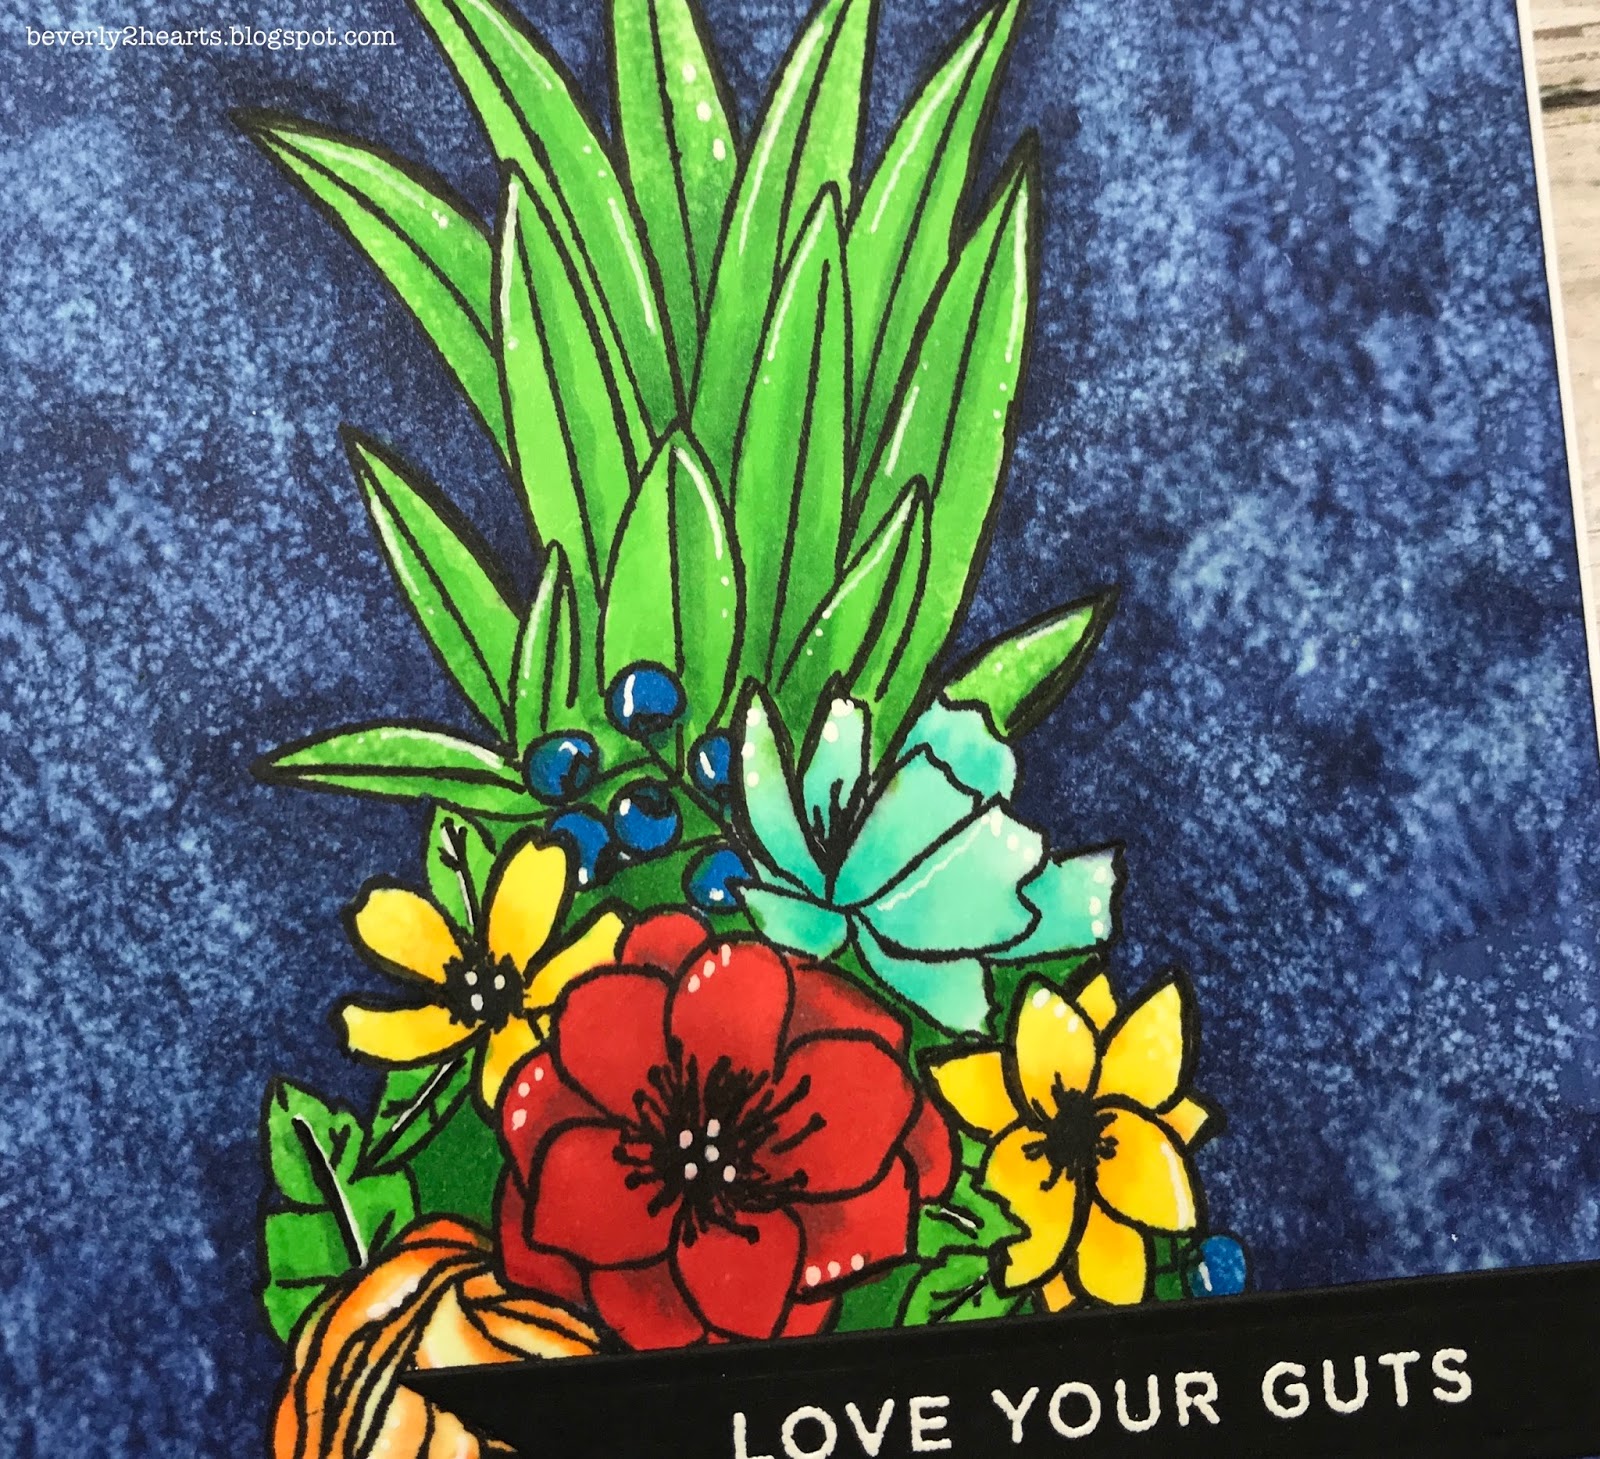
Pineapple Perfection (Concord & 9th) is stamped on Neenah Classic Crest 110lb with Tuxedo Black Ink (Memento) and colored with Copic Markers. Copic Blending Solution and a rag adds texture while a white Gelly Roll Pen and black Micron Pen adds details.
Next is cards stamped with Cosmos Background Stamp (Simon Says Stamps) on Neenah Classic Crest 110lb with Tuxedo Black Ink (Memento) and colored with Copic Markers. Copic Blending Solution and a rag adds texture while a white Gelly Roll Pen and black Micron Pen adds details. I chose not to color the entire image.
All three cards have sentiments from CZ Designs Simple Sentiments (Simon Says Stamps) that are stamped with Versa Mark ink and heat embossed with White Embossing Powder (Ranger). Also each card has Fun Foam behind each image to add dimension.
Here's the picture I promised, Kathy, Becky, Me and Kim.
Have a great day and keep crafting!
Affiliate links are used at no cost to you. Not all links are affiliate, I just want to share where I found them. All products were purchased by me. I don't sell anything and I'm not employed, this is my hobby and hope you are inspired to play :)
When I saw this background stamp from Simon Says Stamps, I fell in love! And then I saw Jennifer McGuire's Video and hands down, it became my new favorite, thank you for your inspiration! Once I got my hot little hands on the Center Cut Heart Background Stamp I knew it was time to watercolor.
First I stamped my image with Versamark Ink on Distress Water Color Paper (Tim Holtz) and heat embossed with White Embossing Powder (Ranger). When I'm using these large background stamps, I often do several at a time. Next I started watercoloring with Gansai Tambi and Water Brush Pen both from (Kuretake). First try I found I had a heavy hand with color so the next few I tried using more of a wash look. After those dried, it was time to make cards.
Out came my trusty Big Shot (Sizzix) and Bold Alphabet Dies (Altenew) to die cut the word You. Using painters tape to line up the dies made it easier to repeat die cutting and keep letters properly aligned. For the sentiments I used You Matter Stamp Set (SSS) and again stamped and heat embossed with white. Cupids Kiss Gems (Studio Katia) add some sparkle.
This card has three layers of Die Cuts stacked and glued with Multi Matte Medium (Ranger)
Hope you have a great day and keep on crafting!
Affiliate links are used at no cost to you. Not all links are affiliate, I just want to share where I found them. All products were purchased by me. I don't sell anything and I'm not employed, this is my hobby and hope you are inspired to play :)
Today I have bunnies....from the Showers and Flowers (SSS) stamp set. Love it when a stamp set has several images to challenge me. These bunnies were too much fun coloring with Copics. I decided to add grass with green copics but then chose to fussy cut one and use Grass Die (Stamps Of Life) along with Puffy Cloud Border (Lawn Fawn) for a different look. Here's my two cards:
First is done mostly with die cuts - I'm telling you, I do love my Sizzix Big Shot. The frame is made with Stitched Rectangles, and the Grass Border and Eggs (Spring Birds) all from The Stamps of Life. To add dimension, two layers of grass and three cloud layers were added. Summer Sky (Memento) ink was added to clouds and frame. Foam tape raises the frame, bunny and stamped sentiment that's heat embossed with White Embossing Powder (Ranger). The bunny has Glossy Accents on his nose and Spectrum Noir Sparkle pen on his fluffy tail. Jewels are from Cupids Kiss (Studio Katia).
Second Card is has a Tumbled Glass distress ink (ranger) sky. This sentiment was stamped with VersaFine Ink and heat embossed with Clear Embossing Powder (Ranger). The edges were torn and inked with Cloud Ink (SOL) and green Offray ribbon is tied in a bow. Again used those Stitched Rectangles from Stamps of Life.
Thursday was a big day for me. If you've read my profile, you'll see that I am a Heart Transplant Recipient times two! Part of being a good steward of this most precious gift is taking care of my health, including daily medication, quarterly blood work and a yearly check up. Thursday was the check up, and this year it was just a stress echo and an office visit. Everything went well and my heart and health is good (Prayers of Thanks). Six years ago, it didn't go well and the result was I needed another transplant....So these annual check ups run my nerves through the ringer. What does this have to do with Deco Foil???? Since we were out of there quick, hubby and I ran some errands, including a stop at Hobby Lobby. I've been watching YouTube Videos and really want to dip my toes in this shiny sparkly goodness. Imagine my surprise when I saw all the Deco Foil on CLEARANCE!!! I cleared the shelf, yep, proud of it too! Bought the Adhesive Pen too with a 40% coupon also.
Ain't that so pretty?
Since I just received my March Monthly Hero Kit plus the Bold Graphic Confetti Die which was an add on - I was ready to play!! So here's the card I came up with:

This month's kit is all about basics and I love those word stamps and dies. The Bold Graphic Confetti Die has Spun Sugar Distress Stain over it and the words were stamped with Cloud Ink (Stamps of Life), corresponding dies were ran through the Big Shot (Sizzix) and then raised with foam tape. Three layers of Neenah Classic Crest 110lb were cut with the hugs die. A generous coat of Adhesive Pen (Deco Foil) coats one layer, 30 seconds later a piece of Rose Gold Deco Foil cut to fit was placed on top. Inside a folded piece of parchment paper and through my laminator it went. I was doing my happy dance when I peeled the foil away! I stacked those layers with Multi Matte Medium (Ranger) and adhered it to my card. Gold and white bakers twine (Paper Studio) finished my card. Now all I need/want is some Transfer Gel and Toner Sheets (Deco Foil)! For now....
Have a great day and keep crafting!
The images are from Choose Joy (Simon Says Stamps). I actually bought it because of the small plaid background and when I started to play I decided to use the small flowers and leaves to make a bouquet.
First I used my Mini Misti to help line up the edges and used Cloud ink (Stamps of Life) to make my background. Then using a roll of masking paper, I stamped the flowers and leaves, cut them out and began stamping using Tuxedo Black Ink (Memento). Next, Copic coloring, I used RV02, RV04, RV06, YG07, G07, Y11, Y15 and Y17. After the images were colored I used my favorite White Uniball Pen (Signo) for accents and a black metallic pen (Gelly Roll) for centers of flowers. Here's where I messed up....I used a Tombow N95 for shadow and I didn't check it out on scrap paper first, that's why my shadow looks a little wonky.
To pull the card together, Stitched Rectangles (Stamps of Life) were used with my Big Shot (Sizzix) and I stamped the sentiment with Versafine and heat embossed Clear Embossing Powder (Ranger). I love the look of a very close layer of paper and I've been using Mini Perfect Layers rulers to get a 1/16" border, however, I can't find them for sale anywhere, otherwise I would link them here. Finally I added a swish of Clear Sparkle Pen (Spectrum Noir) on the pink flowers and leaves.
Hope you have a great day and keep crafting!
There are so many wonderful videos explaining techniques on youtube. How can you resist such fun? I couldn't, so I grabbed a the few alcohol Inks that I had, some Blending Solution and Yupo Paper to play. It helps to have a Alcohol Ink Applicator and a bonus if you have Mixatives, I used silver on these. Four sheets of alcohol ink happiness dried really quick.
For the next two cards, I added a sentiment from Choose Happy (Simon Says Stamps) and heat embossed with silver embossing powder. One has fun foam beneath the white cardstock and one is glued directly to the base.
I absolutely love the word strips that come with the Hearts In a Row Vertical Die-namic - they are perfectly sized for many sentiments. That alone, was reason enough to purchase them, but I'm a sucker for anything with hearts! A few of these cards have some sequins from my stash that are adhered with Multi Matte Medium (Ranger) - it sure makes them secure.
Hope you have great day and keep on crafting!
Hero Arts is one of my favorite companies, I love their products so much, I subscribe to My Monthly Hero Kits. Todays card uses the February 2018 Kit. To change it up a bit, I decided to use my Tombow Markers as watercolors.


First up, you need to use watercolor paper, otherwise, you'll have a muddled mess with paper pilling up, that's been the case for me. Tim Holtz Distress Watercolor Cardstock is great and resists buckling when wet. The February Kit has lots of birds and feathers, I chose feathers for the background. Orange, gold, light brown and a bit of green color markers were scribbled directly onto the stamp. Then I houghed (blew moistened breath on to the stamp) and stamped. Not enough moisture, so I used my Water Brush Pen (Kuretake) to blend water on the cardstock and mix those colors around. After that dried I scribbled a light blue marker on a palette and again used that water brush pen and lightly colored the rest of the background sky blue. Following the same process as the leaves, I stamped a leafy branch and bird from the kit. Using coordinating dies, I ran those through my Big Shot. I used a stitched rectangle die from The Stamps of Life. To get that 1/16 border of Kraft cardstock I used mini paper layer tool and my PenBlade. Finally, I stamped the sentiment in Versa Mark ink and heat embossed Zing Glitter Gold embossing powder.
Have a great day and keep crafting!
I love flowers! Even more, I love crafting with flowers and flower images! During the winter months, it makes me happy. Today I'm playing with the Hydrangea Blooms Stamp and Die Set from Simon Says Stamps. Something about this group of flowers just spoke to me. After stamping several blooms and die cutting them, I started on my card. One just seemed lacking - so I added two more blooms and wa-laaaa!


The flowers are stamped with Tide Pool and Aqua Inks from Hero Arts. Leaves have rock and roll inking on them. When I started to pull the card together, I reached for the Ornate Background stamp, VersaMark ink, Neenah Classic Crest 110 lb cardstock and silver embossing powder (Stampin Up). Chipped Sapphire and Faded Jeans Distress Ink was blended over the embossed areas and ran through my Big Shot with Stitched Rectangle Dies (The Stamps of Life). Hero arts has a Stamp and Cut called Ribbon Message that I love. That's what I used for the sentiment and stamped with Tuxedo Black ink from Memento. One Bloom and the sentiment ribbon are both raised with foam mounting tape, Crystal Stickles were added to flower centers and finally a Shimmer Pen (Spectrum Noir) added sparkle to the leaves.
Have a great day and keep on crafting!


