Tuesday, December 28, 2010

Anniversary Card

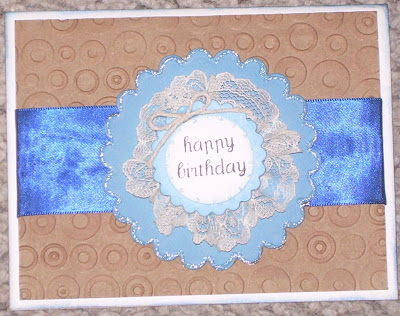
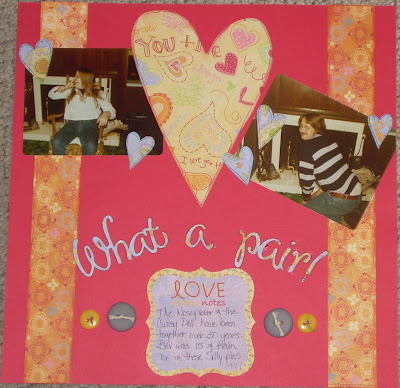
Santa brought me some new cricut cartridges for Christmas and I used Love Struck 2010 for the heart.  Love is Opposites Attract and was outlined in glitter pen.  Got to love this double punch border from Martha!  Just a tiny bit of bling cut from a corner bling from Prima.

I do love using black cardstock as my background so I either use a silver or white pen on the inside so it will pop!
A friend of mine sent me a card and the inside was decorated as well so I've started trying it out.  This was another image from Love Struck and outlined with glitter pen.  Thanks April!

Simple Tags

These very simple tags were made with one punch, one stamp, one color ink, one glitter pen and one pearl.  The tree is outlined in glitter pen.  Easy peasy!

Saturday, December 4, 2010

Giveaway site

For $450 worth of DCWV fabulous goodies click Roberts Crafts Blog

Thursday, December 2, 2010

Last Bit of Tags

I think these are my favorites!  Martha Stewart just does an outstanding job on her punches and this Jingle Bell just makes me Happy!!!!  Target had this silver shiny paper for the bells.  Jillibean Soup, Christmas Chestnut Soup Collection paper and I'm really getting some use out of my Tag punch.  Trim is from Bo Bunny Noel and the snowflakes are from my stash.  Teeny tiny 1/16 inch ribbon fits in the jingle bell and that came from Michaels.  By the way, each sheet of 12 x 12 paper made 18 tags.

More Christmas Tags


More tags made yesterday, this time using pp from Jillibean Soup, Christmas Chestnut Soup Collection and tag punch from Clever Lever.  Bo Bunny Noel trims were used along with Martha Stewarts Loops Punch.  The bright orange paper I had needed to be toned down so I used a little Stampin Up Ink over them.  Then it needed a little sparkle so out came my Stickles.  Left over snowflakes added just the right touch.  A few of these got a leftover Creative Memories Sticker.

Christmas Tags

I had some big fun making these tags.  You see, scrapping is always fun but scrapping with your best buddy makes if BIG FUN.  My best buddy Becky came over yesterday and we had a ball making tags.  This pp is Trim the Tree from OctoberAfternoon and my Clever Lever tag punch came in handy.  I used some leftover Creative Memories Stickers, Paper Studio Brads and Bo Bunny Noel Trims.  Of course I inked the edges.

Saturday, November 6, 2010

All Boy

This layout was for a couple of challenges at Scrapbook.com hence the blue jean pocket (really paper) and to stich on a lo.   Dominic loves to try and climb the flag pole and my Dad's house and my Dad is always only to happy to oblige him.  The "boy" in the title is actually stickers.  The white mat was made with another of Marthas Punch around the Page sets - love those!  All is Don Juan Cricut Cart and the green strips were embossed with cuttlebug embossing folders.

Autumn Details

I used my new cricut cartridge on this one - Graphically Speaking for the "Details".  Stamping and doodling help define the image.  These pics were from a few years ago, as Katie still has her braces.  Apron Lace and Laurel Leaves Punches were also used.  I included the pic of Katie scowling at me as I snap a pic - she does that and I have the pic as proof.

Friday, October 15, 2010

Stitched Flowers


Bazzill Stitch Templates totally rock!  My best friend got me some for my Birthday.  This was my saving grace this past week.  My youngest Daughter ended up having surgery on Monday.  Waiting for Doctors and tests and surgery was hard on me but having something to do with my hands helped me - a lot!!!  This layout has over 600 stitches on it.  I jazzed up each flower with stickles, gems and inked edges.  Some of them are raised with pop dots. 

My local Michaels store had some new Martha Stewart Border punches so I took advantage of that 50% off coupon via the Oprah show!  Thank you Martha and Oprah!!!  This layout has French Scroll and Laurel Leaves punches on it.

Wednesday, September 29, 2010

Scrappy Calendar

So we all know that Scrapbookers are special people, and Special people need special things...Like special calendars...That multi-task!!  I got this idea from my cousin who takes a class once a year, she described it to me.

A Calendar that leaves space to put special moments/thoughts down, a place to staple or glue ticket stubs and other memorabilia with room for pictures and doodling.

Now, I've used a Day Runner for years and years so I'm in the habit if writing stuff down, but these are small and leave no place for the fun stuff.  I switched to My Calendar that has sleeves for occasional pictures but it's too small.


This is what I came up with - 8 1/2 x 11, all acid free, bound with a Zutter O-Wire.  Each month has a colored monthly calendar with stamping.  Following that is 3 pages that I've used stamping spots for journaling and monthly decorations.  I'm not posting pics of these, because I want you to use what you have, like I did.

I used my cricut to cut Don Juan letters 5" tall and then emboss them with cuttlebug dots. 

The protective plastic is from the fabric store and covers both front and back.  A rather large stash of ribbon gave me an assortment to choose from.  The ribbon really does give it that girly look.  I chose the paper from BG's Sugar Rush.

My Niece liked it so much that she wants to make one with me for her Competition Cheerleading Squad in their colors!  I think we'll be making one half this size for her.

Have a great day!

Sunday, September 19, 2010

Think Pink Luncheon


My Mom, Sister, Sister-In-Law and I went to a Luncheon that benefits a local charity that helps women battling breast cancer.  My Longaberger Consultant does this yearly.  The left page tells about all great Longaberger items we won as attendance prizes and the raffle my Mom won.  We all chose to go together to support my Sister-In-Law who's battle has continued.

I'm really loving Basicgreys Sugar Rush, especially it's font.  I also tried out a new sizzix loopy die, sprayed it with glimmer mist for more punch.  I hand cut the two hearts, misted them and added pop dots.

The second page has some prima gems, stickles and two Martha Stewart Punched items.  I love using 1/8 inch ribbon and floss for "stitching" on buttons.  Again, Loving the BG felt stitched flowers!

Saturday, September 18, 2010

Love Card


This card is for a Wedding.  Today.  Nothing like waiting till the last minute to get it done.  I've been playing with my Gypsy and the love image is from the Stamped Cartridge.  I stretched it a bit so the size is a little more than 3".  Glimmer Chalks color the heart and the white layer is embossed with hearts.  Pop dots under love gives a little more diminsion.  I do love these little velvet flocked flowers!

Tuesday, September 14, 2010

Dominic's 1st Haircut

All the products are BG Sugar Rush with the exception of the Bazzill cardstock.  I chose to use grey for the bg as part of a daily challenge over at Scrapbook.com.  There are a wonderful group of ladies who participate in the Anything Goes Challenge.   Having belonged to this group has truly stretched my style to do things I would have never tried.  Thanks to these ladies!!!

Dominic's 1st haircut was such a big deal, I did a mini album but also wanted the event scrapped in my LOM books.

I did add a little bling as in stickles on the journaling spot.

Sunday, September 12, 2010

Eye Surgery

I love the versatility of Basic Grey!  This layout was done using Stella Ruby.  The journaling reads:  The Story  Ian had to have surgery on his eye and he asked if Aunt Bev would come.  Of course I did & I took pictures to show what a trooper Ian is!

The little 7 Gypsies sticker  (Handle with care) are becoming one of my favorite little embellies!  The Tim Holtz Adage Tickets are another fast fav!

Title is done with my Gypsy/Cricut.  I just a lot of 1.3 inch letters using the font Don Juan.  Did them all in black and thought I would try to use them like Thicker letters - only I cut oodles of vowels!!!!

Tuesday, September 7, 2010

Too Big

This was one of those times that it pays to have the camera handy!  I had brought up some baby items that Dominic had outgrown.  However...when he saw them, he had to just try them out one more time.

The paper is Recollections, Thicker felt stickers, Tim Holtz ticket and tiny staples, 7 Gypsy's sticker and BG ribbon.

Sunday, August 8, 2010

Scrap Jewelry

I had such fun making these alphabet necklaces with my neice.  The tiles are like scrabble game
pieces only I got mine at Michaels - in the wood section.   The Bail came from Michaels also only it wasn't exactly what I wanted, so I used my craft pliers and bent them the way I wanted. 

Diamond glaze covers the top for a glassy look and I added irock gems using the heat tool for the Jolee's Gems again, at Michaels.  The chain necklace was from the hardware store @ .88 a foot.  Six of the chain connectors were $1.49 also at the hardware store.

Thursday, July 29, 2010

US Transplant Games

For updates, pictures and news, go to http://www.kidney.org/news/tgames2010/  I'll be competing in Swimming!

Sunday, June 20, 2010

Attendent


Gosh, these pics are from 1987.  My good friend Paula got married and since I was as big as a house pregnant...she asked me to be her Brides Attendent.  I think I was about 7 1/2 months along at the time.  Anyways, I ran across these pics and decided they need a page.

I tried something a little different this time, I cut thin strips of green cardstock and wound them tightly around a thin round filing tool and stretched them out.  Using Zots tiny dots to each end help them stay put. 

Inkadinkado stamps in the corner with dots of green stickles around the boat load of flowers.

The background is DCWV white core paper that I distressed and inked.  There are papers from My Mind's Eye and DCWV and a few others.  All the brads are from the Paper Studio.  Even Martha Stewarts vine punch made it on this lo.

Thursday, June 3, 2010

Make a Wish Card

This card and one almost just like it (different ribbon) was made for my 2 nephews who just had birthdays!  I'm really loving this kraft paper for cards and layouts!  Starting cards are somewhat of a dilema for me - I usually end up picking one thing I want to play with and go from there - with no real plan in mind.  This time, it was the cupcake stamps and copic markers. {I've starting buying the sketch markers to use with - wait for it - the airbrush system that uses copic markers for ink}  It's on my wish list as practically "a need"  ha ha

I used one of those clever lever to punch out the stamped image and then spellbinders nestabilities for the larger scalloped circle.  Martha and her wonderful punches helped pretty this card up.  I punched the border and used my trimmer to make the width 3/4 inch.  This gave me room for my super skinny rickrack and stamped sentiment. Both circles fit on a 3 1/2 inch square and all of this was inked with colorbox ink.   A little touch of crystal stickles for the sprinkles and dots beside the sentiment finishes it off.

Tuesday, May 25, 2010

Easy Fabric Flower Tutorial

For this super easy fabric flower you will need a strip of material 2" x 12", needle, thread, scissors, button or other embellie, button thread and adhesive.

If you want the frayed look, tear your material instead of cutting it.  Make a 1" snip in one end of your fabric.  Grab both ends and pull - hard.

If you are using floss, like I did, separate the 6 threads into 3 before threading your needle.  (Check out my tip on using beading needles).

Using a running stitch (small in and out stitches about 1/2" apart) along the long side of your fabric - close to the edge.  Do not knot either end of your thread.

Gather your material strip by pushing all the fabric together tightly and tie a knot.  Adjust your circle of fabric as needed.

Using that beading needle will accomodate any size cording to "dress" your button (can't have naked buttons, now can we?). 

I don't sew my buttons down, I use Zots medium size glue dots to adhere them.

Here's the finished flower. 
Thank you MommaSaid for the suggestion!

Monday, May 24, 2010

Another layered card


The ribbon on this layered card and on the previous post is something I picked up at the Fabric Store.  They had packages of various ribbon bundled up for only $2.  Hancock Fabric Warehouse was the store.

The image was stamped twice, once on dotted swiss with black ink and once on white cardstock with colorbox chalk green ink.  Using my cutterbee scissors I trimmed just the inner circle and glued it on top of the dotted swiss.  Lime Green Stickles help hide the black ink below.

Again, I used cuttlebug embossing folders with colorbox chalk ink rubbed over the embossing.

The scalloped circles are Spellbinders Nestabilities with some pop dots for more dimension.

Sunday, May 23, 2010

Layered Card

My Mom was given a huge bag of lace from another family member who knows my Mom sews.  Mom makes awesome doll clothes for all her grandkids and being the wonderful Mom that she is, she passed on the bag and said to pick some out! 

Soooooo I made some flowers by gathering one edge with a running stitch and then pulling tight.  A knot secures the flower.

In this layered card, I used some Hero Arts Stamps, a 1 1/4 circle punch, 2 sizes of the scalloped circle nestabilites, of course my favorite ink (colorbox chalk ink), cuttlebug embossing folders and stickles.  The little string bow was attached with diamond glaze.


Friday, May 21, 2010

Calming Curious George

I got this Recollection Paper at Michaels the other day and knew this was the picture for it!  I used my Gypsy to weld the letters from the Gypsy Font.  A little Glimmer Mist gave the kraft paper title some sparkle.
The loops punch around the page punches from Martha Stewart are one of my fav's for matting pictures.


The accordian flower was my first project using my newest tool from Martha (see below post).  One of those clever lever scalloped punches was the base for the other flower.  Waterfall, Lime Green and Orange Peel stickles spice up this flower.  Doodlebug Frill Stickers make up the the stems.  Finally, I journaled on a 2 inch piece of kraft paper and put down stich stickers along the sides.

As you can see in the picture, my Grandson Dominic, dumped out the towels on the floor and climbed in the laundry basket for a comfy place to watch his most favorite show - Curious George.  This is our go to "calming method" for right now.

New Tool


I was browsing through Michaels the other day and look, Martha Stewart has a new tool!  And it's almost half the price of the Score pal - only $19.99.  Plus it comes with a a triangle tool to make envelopes and and a drawer to hold the score tool.


Here's a pic of inside the little door. It has all the measurements for standard card sizes and boxes with fold lines marked also. The triangle has a lip on the other side to keep it in one of the grooves and measurements for standard size envelopes. How cool is that?


Bonus!!!!! Michaels takes the 40% coupon for this item.

Score!!!!!

Sunday, May 16, 2010

Button Tips

I just adore buttons!  But...I like them to look sewn on.  A layout with buttons that aren't sewn on just makes me crazy.  We all have those little quirks and this is mine.  With that said, I have found a few ways to make sewing on buttons a little easier and thought I would share.

My first share is using beading needles.  You can find them in the bead section of the craft store. 

They are connected at the ends and the middle is open.  I put one of my favorite gems in the center to make this point.


Often, when I have more than one button, I just thread and tie them all in a row.


Afterwards I snip the ends with my favorite Tonic scissors.  These things are super sharp and cut ribbon and floss without leaving those little snags.                                     

My favorite adhesive to use to secure buttons down is Zots Medium glue dots.                               
I hope this inspires you to break out your buttons and sew them down!!!!!!  If you choose not to sew them... well....I promise not to hold it against you!  Lol  Have a great day! 

Friday, May 14, 2010

This is Mans Work


I received a box of goodies from Scrapbook.com for participating in their National Scapbooking Day Challenges. I got these fabric covered thickers; Green At Heart Dimentional stickers along with a host of other goodies. I had to bust these out to scrap these pics of Dominic and his Dad mowing.

I think this is one of the first times they mowed at their very first home! For a long time Dominic just loved to "help" mow but it seems lately the noise is a little scary.

I used the Crafters Workshop template for the 6" label and circle. I cut a 2" strip and 4 1" circles out of the striped paper and inked them with Colorbox Chalk Ink. I seem to reach for these little gems frequently! I just love the softness of the chalk ink. Signo makes the best white ink pen there is (in my opinion), it really stands out on just about any paper or photo. I used .005 black micron to doodle around the label. A layout from me just isn't complete unless I sprinkle a little bling - so for this one I used the lime green Stickles as dots around the green circle.

Aside from textured Bazzill Background paper, everything else is BG Green At Heart.

Wednesday, May 12, 2010

Some really old silly pics!


Yep, that's me on the left with my finger up my nose. The really silly part is Kevin has a darker mustache because I colored it with my mascara!

We were 15 and 16 here and it was fun finding these pics and even more fun scrapping them.

All products are either BG Sugar Rush or matching Bazzill.

Of course I used my gypsy, cricut and yes, lyrical letters cartridge for the title work.

And what's a layout without a little stickles? It seems I can't keep those little dots from slipping away to no where land when removing them before placing them on the page. So I usually end up with a stickles dot!
The hearts are all hand cut with those wonderful Tonic Scissors and doodled with Micron pens.

I'm sorry to those who I offend with this next statement - Buttons without fibers or something just look NAKED. Some floss and fiber completes this lo. Thanks for looking

Monday, May 10, 2010

Great On Line Scrapbooking Store

I love shopping on line for scrappy supplies but get completely bummed out when the shipping costs totally wreck my budget. www.scrapbookpal.com has free shipping on orders of $25 or more. How cool is that!!!!

Another Reason why I love my Gypsy


Did you know that with the original Cricut Personal Cutter the smallest size you can cut is 1 inch? Using the Gypsy you can resize your image/font smaller. That's just one more reason to get this Fabulous tool! The feature I love the most is Welding (or smooshing the letters together) so your letters come out as one piece for SUPER FAST Titles!!!!


Don Juan is the Cartridge I used on this layout. The black title was a little harsh against this light blue so I did a little pen work around the letters.

In the right hand corner is the smaller than 1 inch date. The title is cut at 1.5 inches and welded together.

I used the Martha Stewart Loops Punch Around the Page for the small frame. I have waited a long time to get my hands on this set! A little Cat's Eye ink and some Baby Blue Stickles, tada!

Wednesday, May 5, 2010

More Lyrical Letters


I'm really loving cards with Kraft Paper and was able to whip these two out so quickly!

The Spellbinders Nestabilities Label 8 dies are perfect for cards. I cut two and then doodled around the edge.

I used the Lyrical Letters for both sentiments. Love that both were a 1 button option. By pressing the shift key I was able to get the flower/stem/leaf cut in another color. (I used Copic markers to color the stem and leaf.) A gem and a bit of Baby Blue Stickles finished off the flower. A little stamping and I'm done!


Again, I used the Lyrical letters cart for the leaves and Orange Peal Stickles for the knot in the bow.

Love those one touch cuts!!!