Hello all,
Today I have a quick Graduation Card. Well, quick if you have done several deco foil backgrounds prior! The background is done with Deco Foil Transfer Gel, Gold Foil, Radiating Rays Stencil and a Laminator. Hero Arts makes several Stamp and Cut Sets and the Congrats Stamp and Cut is definitely one you should have in your stash! It's versatile to handle several occasions and even has tiny sequin stamps. I cute a piece of Neenah Classic Crest 110lb card stock and ran it through my Sizzix Big Shot with Stitched Circle Dies. Then using Tuxedo Black Ink I stamped the sentiment. Using black cardstock with Sizzix Adhesive Sheets, I die cut the word congrats three times and stacked them. To bring the card together, I trimmed a piece of fun foam to raise my die cut circle and used Nuvo Deluxe Adhesive to attach to foiled piece. Using those Sizzix Adhesive Sheets really saves some time stacking up thin dies. I did use my Powder Tool on the adhesive die that overhangs the circle to deactivate the stickiness. Since my card base is black, I did line the inside with a 4x51/4 piece of white card stock. This what I won't have to search for my favorite White Uniball Gel Pen.

Have a great day and keep on crafting!
Affiliate links used at no cost to you. Not all links are affiliate, I just want to share what I used. All products were purchase by my unless noted. I don’t sell anything nor am I employed. This is my hobby and I hope to inspire you to play :)
Hello all,
Power Poppy has this wonderful stamp set called Party Time and I love that you can change up the sentiment on the banner. It also has a bunting and a slice of cake with a candle and a very cool stack of presents. Today's card uses this set. I colored my chocolate cake with Copic Markers after I stamped the image with Tuxedo Black Ink onto Neenah Classic Crest 110lb Card Stock. To make my cherries shine I covered them with Glossy Accents. Then I die cut my chocolate cake using Stitched Circle Dies through my Big Shot. For the background, I used Bazzill Canvas Bling Cardstock with Horizontal Stripe Die. To bring the card together, I attached the background to my card base with Kokuya Long Line Adhesive. I trimmed some fun foam to fit behind my stitched circle and used Nuvo Deluxe Adhesive to attach. Then using the included word hooray I die cut black cardstock with Sizzix Adhesive Sheets attached to the back - to make attaching easier.
Have a great day and keep crafting!
Affiliate links used at no cost to you. Not all links are affiliate, I just want to share what I used. All products were purchase by my unless noted. I don’t sell anything nor am I employed. This is my hobby and I hope to inspire you to play :)
My kit came on Saturday but since we had 2 Grandson's Baseball games and Sunday was Mothers Day - I had to wait until today to play! Boy did I have fun! This month's kit is awesome and I really love the bigger dies they have been including!
For this card, I used the tissue paper that the kit was wrapped in. First I spread Mod Podge on Neenah Classic Crest 110lb card stock and crinkled up the tissue paper and smoothed in the glue. Let it dry and trim up the edges. For the clouds I ran Puffy Cloud Border Die (Lawn Fawn) through my Big Shot (Sizzix) and brushed Glitter Brush (Spectrum Noir) for some sparkle. Then I stamped in Tuxedo Black Ink (Memento) images from the kit. I did have to go in with a black pen to color over the texture. The sentiment is also stamped in Tuxedo Black and die cut with Stitched Rectangle Dies (The Stamps of Life).

I bought the add on Family Word Bold Print Stamp and a used the same Neenah paper. Stamped with VersaMark Ink and sprinkled Clear Embossing Powder (Ranger) and heat set. Blended Picked Raspberry Distress Oxide and Wilted Violet Distress Oxide Ink over the embossed area. Then I used a sentiment from the March My Monthly Hero Kit and Bold Alphabet Dies on Glitter paper. Tied it with a pink ribbon and mounted it on my black card base.
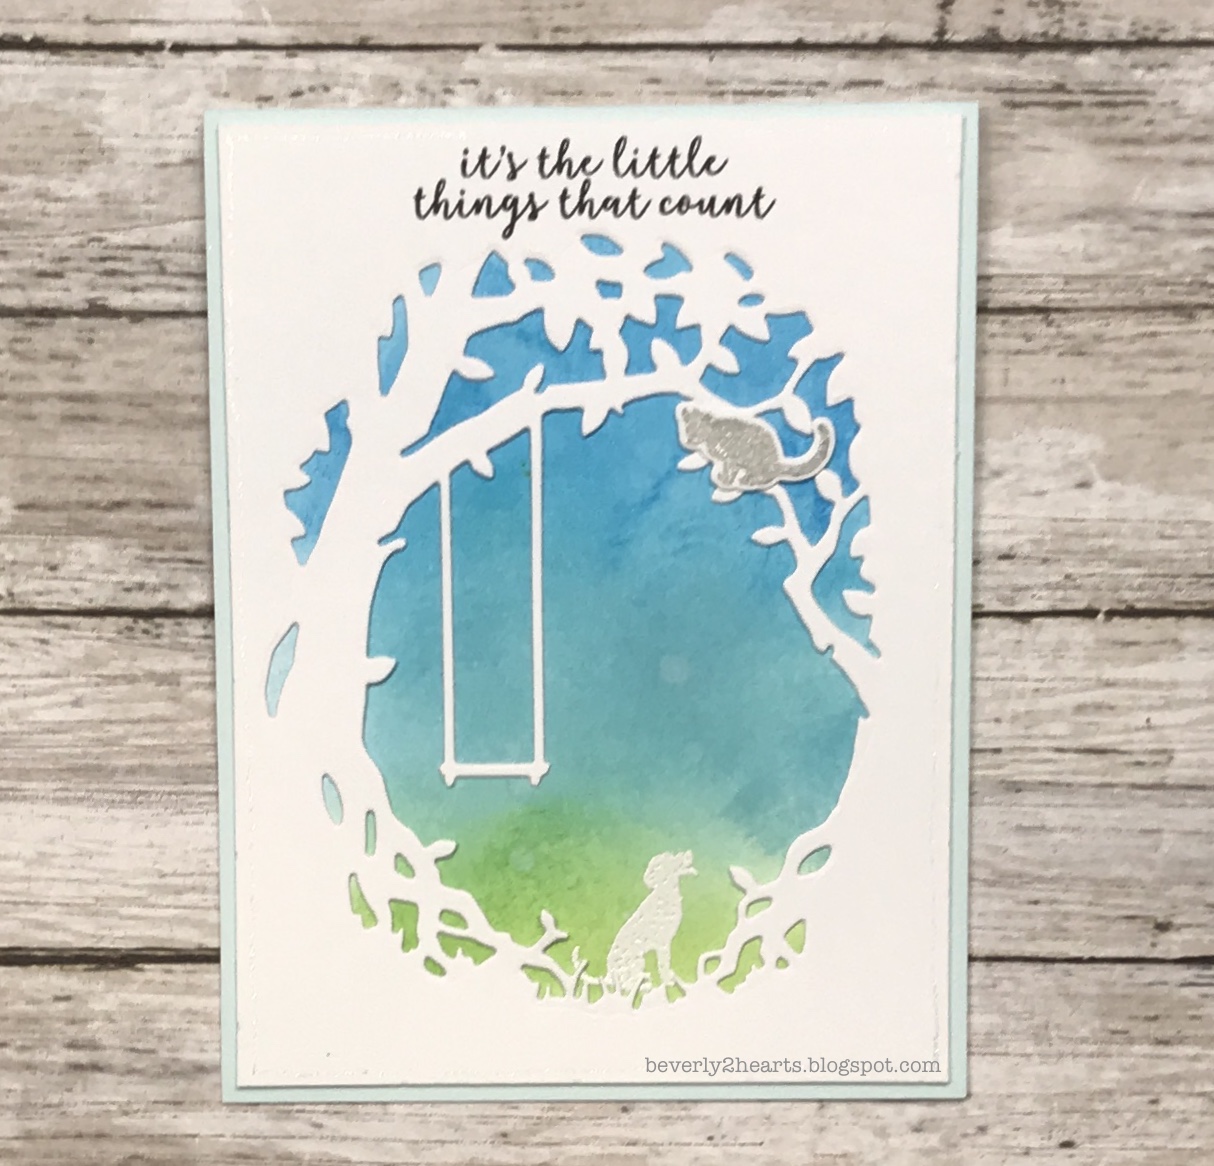
For this last one, I used that beautiful big die. For fun, I stamped and embossed a dog and cat - thought it went well with the sentiment. I also used some distress inks to blend the background.
Hope you have fun playing with your kit from Hero Arts! Have a great day and keep crafting!
Affiliate links used at no cost to you. Not all links are affiliate, I just want to share what I used. All products were purchase by my unless noted. I don’t sell anything nor am I employed. This is my hobby and I hope to inspire you to play :)
Hello all, hope you having a great day!
This card uses the most wonderful products (in my opinion) - Deco Foil! Love love love it for adding that beautiful shine! Spread some Deco Foil Transfer Gel over my Large Flower Stencil (Hero Arts) and let it dry. Then placed Silver Deco Foil over the dry gel and ran it through my Laminator. The best part is revealing the gorgeousness when you peel up the foil sheet!
I stamped with Versafine Ink using Thankful Heart Stamp Set (Simon Says Stamps) and sprinkled Clear Embossing Powder (Ranger) and heat set. I then used my trusty Big Shot (Sizzix) and Stitched Squares Die Set and Square Die Set (Both from The Stamps of Life) to cut the sentiment and shadow. For a final touch I pulled a button from my stash that I made out of Filmo Clay a while ago. It's dotted with a White Uniball Pen and tied with scrappers twine. Both the sentiment and button are raised with foam tape.
Have a great day and keep crafting!
Affiliate links used at no cost to you. Not all links are affiliate, I just want to share what I used. All products were purchase by my unless noted. I don’t sell anything nor am I employed. This is my hobby and I hope to inspire you to play :)
Hello all,
Today's card is made with a die from Memory Box. It's called Heart Wave and I bought it at a Creative Keepsake Convention. The booth that I found it does not have an online store....
After I ran the die through my Sizzix Big Shot twice, I used Sizzix Adhesive Sheets to apply the die cut and Ultrafine Glitter back into another cardstock of a different color. You can see one white inlaid heart, that's because I like it there! Yep!
The sentiment is from March 2018 My Monthly Hero from Hero Arts. I die cut the sentiment from Deco Foil Toner Sheet and placed a piece of Rose Gold Deco Foil over it and ran it through my Laminator. I'm just loving that Rose Gold! I used Multi Matte Medium to adhere the sentiment. A few drops of Glossy Accents finishes my card.
I hope you have a great day and keep crafting!
Affiliate links used at no cost to you. Not all links are affiliate, I just want to share what I used. All products were purchase by my unless noted. I don’t sell anything nor am I employed. This is my hobby and I hope to inspire you to play :)
Two cards and a layout for Scrapbook.com National Scrapbooking Day and one of those cards is for Power Poppy's Hues to Use Challenge.
Party Time Stamp Set from Power Poppy was stamped with Tuxedo Black Ink (Memento) on Neenah Classic Crest 110lb and colored with Copic Markers. Happy Birthday from Hero Arts Ribbon Messages Stamp & Cut was also stamped on Neenah with Versafine Ink. It was sprinkled with Clear Embossing Powder (Ranger). The background is a Bold Confetti Die (Hero Arts), the colored image was cut with Stitched Rectangles Die (Stamps of Life) and the sentiment was all run through my trusty Big Shot (Sizzix). The colored image and sentiment are raised with scotch foam tape. This for the Die Cut Challenge.
This card was made with Written in the Stars and Die-namics Shining Stars. The background is made with Distress Oxide Inks (Ranger). This challenge was to show your style. Mine is sparkly and colorful!
This is for the Live Love Laugh Challenge - using lots of embellishments. These papers are from Echo Park. My Grandson is quite a bit younger here. I did manage to stitch on the side with Sew Easy Tool.
Hope you are all spending time crafting today! Happy National Scrapbooking Day!
Affiliate links used at no cost to you. Not all links are affiliate, I just want to share what I used. All products were purchase by my unless noted. I don’t sell anything nor am I employed. This is my hobby and I hope to inspire you to play :)