Showing posts with label Altenew. Show all posts

Thursday, February 20, 2025

All Kinds of Wonderful Card

 My goodness!  If you are a lover of stacking dies - Elephantastic is the way to go.  Altenew has a tiny arrow imbedded in this die, so when you layer them up, it's easy to place them perfectly.  Only the top layer doesn't have the arrow.  Meaning those dies that have a "helper" and the placement is not obvious - that arrow rocks!  When I first saw this die I was drawn to it, such perfect details.  Social Media is full of reels with baby elephants lately and I just can't look away.


All Kinds of Wonderful


This card came together with Ocean Waves Bold Back ground stamp in my MISTI using Grassy Knoll ink.  The trimmed piece is backed with black card stock.  Empress Elite makes die cutting Elephantastic on Fog Card stock easy peasy. Bearly Arts Glue is my glue of choice lately and like I said above those elephants were quick to assemble.  Finally Skinny Sentiment Strips 1 placed in my MISTI made stamping with Versafine Onyx ink fast and aligned.

Have a great day and keep on stamping!

Affiliate links used at no cost to you.  Not all links are affiliate, I just want to share what I used.  All products were purchase by me unless noted.  I don’t sell anything nor am I employed.  This is my hobby and I hope to inspire you to play :)


Wednesday, March 9, 2022

More Pinkfresh Studio Floral - Sympathy Cards - Choose Hope

 Just like my previous post - I'm loving the whole Pinkfresh Studio stamp, stencil and die sets!  This time it's all about Choose Hope.

Unfortunately I needed to make some sympathy cards so when I created a whole bunch of the floral sprays ready to go, I had what I needed to make some quick cards.  Again, I pulled out some cover dies, embellishments and sentiment stamps and put these together pretty easily.

http://beverly2hearts.blogspot.com

  
http://beverly2hearts.blogspot.com

http://beverly2hearts.blogspot.com

http://beverly2hearts.blogspot.com
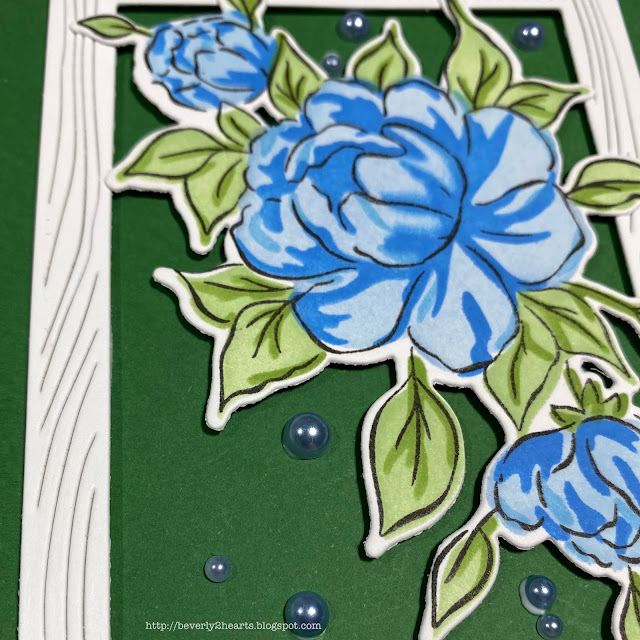
These florals were colored with Pinkfresh inks: Sky Blue, Summer Shower, Seaside, Fresh Pear and Grassy Knoll.  Blender Brushes made the coloring super quick with layering stencils.  Pixie spray helped with those stencils! MISTI helped repeated stamp Choose Hope with Amalgam Ink and of course the Gemini Jr made fast work die cutting.  For the cover dies, I chose Horizontal Stripes, Wood Frame Infinity Die and Leaves and Vines with a white 110 lb card stock.  Scotch foam tape was used with the frame die.  All the card bases were made with Recollections 110 lb card stock.

Sentiment Strips were stamped and attached with Bearly Art Glue.  Embellishments are from Trinity Stamps.  The Tiny Words stamp is from Simon Says Stamp.  Some sparkle pen was used for shimmer.

Have a great day and keep on crafting!

Affiliate links used at no cost to you.  Not all links are affiliate, I just want to share what I used.  All products were purchase by me unless noted.  I don’t sell anything nor am I employed.  This is my hobby and I hope to inspire you to play :)


Sunday, September 6, 2020

Graduation Celebrate with Pop Up Card

I needed a graduation card but wanted something non-traditional.  So I chose celebrate rather than congratulations.  I’m very proud of this graduate and she has big plans!

http://beverly2heaarts.blogspot.com

http://beverly2hearts.blogspot.com


Starting with a top folding base I chose Grapesicle.  Next I used the quilted background die with white card stock.  Ran that through my Gemini Jr..  Next I used the Celebrate die and cut two white and one from silver mirror card stock.  Once that was done, the layers are attached.  I had some colored wired ribbon in my stash that looked perfect.  I wrapped it around the white background piece and attached on the reverse side.  Next I glued that to the background and applied the sentiment with enough glue to soak through the ribbon.  That pretty light purple peeks through the “quilting”.


For the inside, I chose Pivot Pop Up and again chose that same silver mirror card stock for the Bold Numerals 2020.  A very close color match of ink is brushed around the edges.


The sentiment and signature was inked when I realized I hadn’t taken a photo, so I layed a piece of card stock over for the pic.


Have a great day and keep on crafting!


Affiliate links used at no cost to you.  Not all links are affiliate, I just want to share what I used.  All products were purchase by me unless noted.  I don’t sell anything nor am I employed.  This is my hobby and I hope to inspire you to play :)


Saturday, July 11, 2020

Congratulations Slimline Card

Todays card is quick and easy and is part of #thedailymarker30day challenge.  The coloring part is is the second layer.  I didn’t have the right color blue card stock, so I used ink and made it.

Using the Large Slimline die and the Small Slimline with flaps dies, I used my Gemini Jr to cut all three layers, the royal blue and two white panels.  Summer Sky ink is the perfect color, so I used a blender brush to color the edges.  The top panel covers the middle.

Congratulations was die cut with Bold Alphabet from glitter card stock.  It was a glittery afternoon!  I attached the lined up letters with Connect glue and adhered all three layers onto my card base.

This card is for a High School Graduate during this pandemic.  I chose his school colors and I’m sure he will appreciate the inside ($$$) more than the card itself, lol!

Have a great day and keep on crafting.

Affiliate links used at no cost to you.  Not all links are affiliate, I just want to share what I used.  All products were purchase by me unless noted.  I don’t sell anything nor am I employed.  This is my hobby and I hope to inspire you to play :)

Wednesday, April 8, 2020

Hello Friend Art Supplies Card

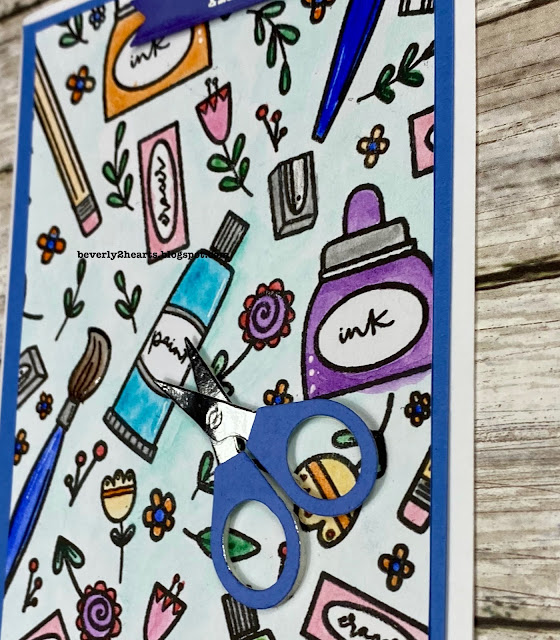
Todays card is for all the crafters!  I fell in love with this stamp set and decided to buy it on a Wednesday - well, let me tell you, on Wednesday Lara at Ink Road Stamps has a gift with purchase and that's how my order grew....sound familiar?  So take a visit to Ink Road Stamps on Wednesdays to get your shop on!

Holly Pixels Art Supplies Background stamp his stamped on Bristol paper and watercolored with Altenews Water Colors.  Details were added with a white gel pen, sparkle pen and glossy accents.  I backed this piece with blue card stock and attached to my card base.  

That's' when I decided it needed more.  Using Concord & 9th craft dies I die cut the scissors and layered them.  The sentiment is from a Hero Arts Monthly Kit and is heat embossed with white embossing powder.  Both the scissors and sentiment is raised with foam tape.  I made two of these and they are going out to two special friends!

Have a great day and keep on crafting!

Affiliate links used at no cost to you.  Not all links are affiliate, I just want to share what I used.  All products were purchase by my unless noted.  I don’t sell anything nor am I employed.  This is my hobby and I hope to inspire you to play :)

Wednesday, September 18, 2019

Same Card, Two Colors, One is "black, like my soul"

Now I know that title sounds a bit weird.  Backstory is that I was making a card for someone specific.  I chose two colors of pink and gray.  Turned out really cute but then I remembered something she said recently.  She saw the new Starbucks reusable cup - it was textured and black - she "needed it because it was black, like my soul".  So I remade the same card with gray, black and black glitter and it looked pretty cool too.  I don't know if I'll give her just the black one or both.  Here they are:
Altenew Floral Cover Die


Altenew Floral Cover Die

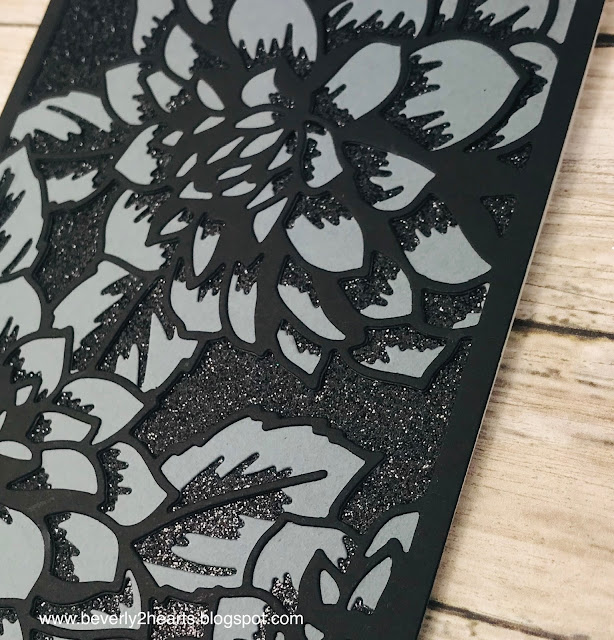
Both cards are made the same way, using my Gemini Jr to die cut the Floral Cover A & B dies.  These dies make cards come together really quickly.  Just glue the die cuts together and then to a card base.  

The pink card has a sentiment from Sketched Flowers and was stamped with Soft Granite Ink and then again with Versamark Ink in my Mini Misti.  Clear Embossing powder was heat set with my Heat Tool.  This was die cut with Majestic Labels and backed with fun foam before adhering to the card.   Cupids Kiss gems were added to finish the card.

The black card has black glitter card stock behind the die cuts.

Have a great day and keep on crating!

Affiliate links used at no cost to you.  Not all links are affiliate, I just want to share what I used.  All products were purchase by my unless noted.  I don’t sell anything nor am I employed.  This is my hobby and I hope to inspire you to play :)

Saturday, May 4, 2019

Cards made with Giveaway Goodies

On Instagram I enter quite a few Giveaways.  If I like what the creator posts, I am happy to follow them and share with like minded buddies.  Much to my surprise, I won a Giveaway and it had an item that I've had on my wish list.  Actually, I've put it I'm my cart many times, only to remove it because I couldn't justify another watercolor set on my budget.  Loraleeferguson offered this fabulous giveaway and I won!  Lora makes beautiful cards, click on the link above and check her out!  Here's a picture of what I won.  Check out her homemade card!


With this great giveaway, I made four cards and had a blast playing with the Altenew Water Color Set.  It's small and oh so fun to use!  The Floral Spring Stamp and Die Bundle was used with Onyx ink on Tim Holtz Water color paper.  After the image was painted and dried, I used stitched rectangles to die cut with my Gemini Jr.  Finally, I used that same ink and sprinkled clear embossing powder and heat set the sentiment.  Fun Foam is added to the back for dimension before adhering to my top folding card base.  Some of the cards have different ribbons and sequin embellishments.
Floral Sprig

Floral Sprig

Floral Sprig

Floral Sprig

Have a great day and keep on crafting!

Affiliate links used at no cost to you.  Not all links are affiliate, I just want to share what I used.  All products were purchase by my unless noted.  I don’t sell anything nor am I employed.  This is my hobby and I hope to inspire you to play :)
Sunday, March 10, 2019

Gamer Birthday Card

Hello there, got a card today that I made for my Grandson Dominic.  He's really into video games and happened on one of those great clearance section at Hobby Lobby and snagged this beauty on sale with him in mind.  A personalized card is going to mean a lot to him, so I pulled out my luggage tag alphabet dies.  Here's a hint - I didn't clip each letter out, I clipped each row and kept them together when I first removed them from the package (I'm talking about the little tabs that hold all the dies together).  This way there is less to lose and I'll keep the extra letters in a plastic sleeve.  I die cut his name and the game dies out of black card stock.  The screen piece has lots of white pigment ink rubbed on.  The sentiment was cut from mirror shiny card stock.  My background is done with a stencil, stencil brush and two colors of ink.  The borders of the stencil and backing piece are cut with stitched rectangles dies.  Glue brought this all together - easy peasy.
http://beverly2hearts.blogspot.com
Have a great day and keep on crafting!

Affiliate links used at no cost to you.  Not all links are affiliate, I just want to share what I used.  All products were purchase by my unless noted.  I don’t sell anything nor am I employed.  This is my hobby and I hope to inspire you to play :)

Wednesday, February 28, 2018

Camellia Build-A-Flower Birthday Card

Sometimes I pick up a product to play with and just struggle deciding how to use it.  Not the case today!  Youtube has wonderful videos and Jennifer McGuire Ink's Stamp Layering video inspired me.  Strongly suggest you check her out!!!  

Using Camellia Build-A-Flower Stamp and Die set (Altenew), on Neenah Classic Crest 110 lb card stock I stamped the flower with Tropical Raspberry (Ranger), Abandoned Coral Distress Oxide and Candied Apple Distress Oxide inks. Then stamping the leaves with Twisted Citron Distress Oxide, Green Leaf (Simon Says Stamps) and Moss (Hero Arts) ink.  Using my Mini Misti made stamping multiples super easy.  Next I die cut flowers and leaves with the corresponding dies in my Big Shot

Hobby Lobby recently had clearance dies and todays card uses one.  Decorative Curved Squares (Spellbinders) was easy to release from the die since I used a sheet of wax paper between the cardstock and die.  I then inked the edges and adhered to my base.  The flower was then raised with foam mounting tape and leaves tucked under.

Final touches include a Happy die cut and Birthday stamp from Happy Stamp and Cut (Hero Arts).  Versafine Black ink and Clear Embossing Powder helped the sentiment pop.  Multi Medium Matte adhesive works great for gluing those tiny bits down.  Finally, Sheer Creations ribbon (Michaels) is tied in a bow.  

Have a great day and keep on crafting!

Sunday, February 11, 2018

Starry Night Wedding Card Using My Monthly Hero Kits

Today's card is for a special wedding we went to last night - couldn't share until now.  The Bride chose a starry night theme so I mimicked her invitation.  Thanks to My Monthly Hero subscription, I did not have to buy anything new - just looked through previous kits.  Found what I needed in the August 2017 and January 2018 kits!

Starting with Neenah Solar White 110 lb Cardstock, I stamped swirling stars from the August 2017 My Monthly Hero Kit with Versa Mark Ink and sprinkled Ranger White Embossing Powder then used my Marvy Embossing Heat Tool.  Next, I applied Salty OceanBroken China and Faded Jeans Distress Ink, blending well.  To add shimmer I sprayed Sheer Shimmer Spritz.  Now for my favorite part - die cutting!  The Stamps of Life Stitched Rectangles die for the base, the & is from the January My Monthly Hero Kit and the mr and mrs is cut 3 times and stacked with Bold Alphabet from Altenew. Next I inked the edges of & with Tumbled Glass distress ink, the back ground with Black Soot distress oxide ink and outlined the mr and mrs with Gelly Roll Stardust Pen.

To pull it together, I mounted the background onto fun foam with Scor-Tape, adhered to card base, placed glued my elements in place and added star sequins that came in the August 2017 kit with Multi Matt Medium.  Inside I used a sentiment from Justrite Stamps - Elegant Celebrations.

Have a great day and keep crafting!
#mymonthlyhero #heroarts #altenew #distressinks #sizzix #boldalphabet

Thursday, February 1, 2018

You & Me Card with My Monthly Hero Kit

I've been receiving the My Monthly Hero Kit for nearly a year now and absolutely recommend joining!  Hero Arts offers it and you receive product nearly doubling the fee.  It also sells out Fast!  

Todays card uses the January 2018 kit and I had some fun playing!
Isn't that & really cool?  It came in the kit.  The Festive Bauble Bold Print background stamp and Mulled Wine Ink is also from Hero Arts.  Shimmer is added with Sheer Shimmer Spritz all over the background.  Letters u and me are Altenew's Bold Alphabet Die Set and inked with Hero Arts Bubble Gum ink.

Thursday, July 13, 2017

Sympathy Cards with New Technique

First of all, I love watching new technique videos on Youtube.  Jennifer McGuire is my favorite and today I'm showing you my take on her technique.  The link to her video is here.  I highly recommend visiting her site, you could spend days watching all her crafty goodness!

So, I love making cards, but it's very sad when the reason is loss.  A family member passed and a very good friend lost her husband, both were very unexpected.  Instead of struggling to design a card, I poured my love for these people into making the cards.

Here's my card, I made two of these...


The stamps and dies are a flower building set from Altenew called Camillia.  The prayer sentiment is from Hero Arts called Prayers Stamp and Cut.  I chose to use the new Distress Oxide Ink Wilted Violets for the flower and three different colors of green from my stash.

Keep on crafting and have a great day.